How to De-Winterize an RV
Spring is on it’s way and once the temperatures are reliably going to stay above 32 degrees you can now safely “de-winterize”. The following steps will show you, in order, how to: run all the antifreeze out of your water lines, ready the water heater and take it out of bypass mode, and ready your holding tanks for summer use.
I assume you winterized your camper properly (or had it done at a dealer) last fall. If not, you may have some issues to deal with this spring.
Before we get started it is important to note that some of the links below may be affiliate links. This means that at no cost to you we may earn a commission if you click through and make a purchase. This is how sites like ours pay to “keep the lights on”.
De-winterizing Your Camper
1. Walk around the inside and outside of the camper and shut off all the faucets and open all the sink drains.
2. Look underneath the camper and be sure the low point drain valves are closed, along with the freshwater tank valve.
3. Fill the fresh water tank about half full.
4. Go inside the camper and turn on the water pump. You should be able to hear the water pump pumping. The pump should build some pressure and then stop. If it continues to run there is an open valve somewhere in or around the camper or a terrible leak. It is important to find this open valve or leak. If it is not either of these two, and you have no water coming out of your faucets check the valves by your water pump. You are likely still in “winterizing” mode.
5. Open the kitchen sink valve on the cold side. Allow it to run. The fluid coming out should go from pink to foamy and then to a nice clear stream. Shut off the cold side on the kitchen sink and open the hot side on the same sink. Again, run the antifreeze out of the water line by allowing the fluid to go from pink to foamy to a nice clear stream.
6. Repeat step five at all faucets. This includes: sinks, showers, and toilets. Don’t forget your outside sinks and showers.
7. Once you have completed step six I like to repeat steps 5 and 6. I go back to the first sink and do it all one more time. This time instead of looking at the stream look at the puddle in the bottom of the sink. Once all of the bubbles are gone all of the antifreeze is out of the waterline.
8. Next take the water heater out of bypass mode. The valves are usually accessed by removing a panel inside the camper behind the water heater. Sometimes, however, the valves are located in the basement which may or may not be easy to reach. Ideally, your camper will have a “winterizing valve”.
Most campers have 3 valves that need to be turned.
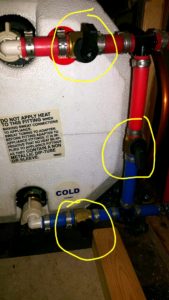
Some have 2 and some even have 1.
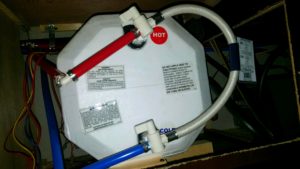
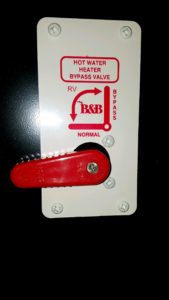
The goal is to allow the water to fill the water heater. I usually leave my water heater plug out until I have water spilling out the plug hole outside. This part of the water heater is sealed and water spilling out will not hurt anything. Allowing the water to run out will help rinse out the water heater tank. Once water begins to dribble out onto the ground you can install your plug very easily. The reason that I do this is because the plug is higher than the bottom of the tank so some water has been sitting in the tank all off-season and could be icky. This will wash it out.
9. Now that the water heater is “in the loop” you will hear the water pump pumping water in to the water heater. Now, open up the kitchen sink hot water handle. There will be a bunch of air burping out of the faucet and it will probably splash water onto your counter as well. Once there is a nice stream coming out of the hot side of the faucet all of the air should be out of the water heater.
10. The water heater is now ready to be turned on. I usually turn on the gas portion of my water heater. You should feel warm water coming out your faucet after about 15 minutes of water heater operation. If you still have cold water, you likely did not turn your valves properly on your water heater.
Caution: If the electric heating element on the water heater is turned on, and you do not have water in the water heater, you will melt the heating element in as little as 10 seconds.
11. If you have a washing machine it is wise to cycle the machine two to three times empty to run the antifreeze out of the lines.
12. The same hold true for an ice maker. Run the machine and dump the ice. It seems to usually take about 3-4 trays to get the antifreeze out of the lines.
13. All that is left is to add chemical to the black water tank along with about 1 gallon of water.
Now that the water system is de-winterized many people will choose to sanitize their camper’s water lines right after de-winterizing it. Doing so will eliminate odors and bacteria. To do this, you can run an RV water line sanitizing chemical through your lines. Unlike RV antifreeze this sanitizer can go through your water heater. After draining the sanitizer from your water lines and and water heater. Refill with filtered fresh water.
Note: If you are not going to be using your RV for an extended period after you have de-winterized (like between camping trips) it please empty the fresh water tank, lines, and water heater. Sitting water can become rancid and really yucky.
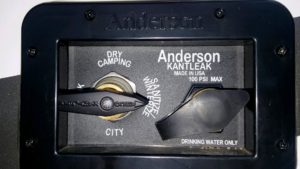
Water Connections
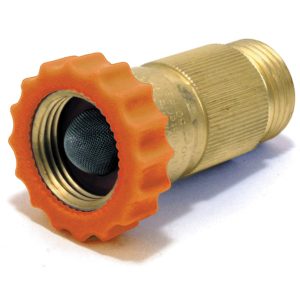
Always use a water regulator. The water regulator will reduce the water pressure to 45 lb which is safe for your camper. You can put this water regulator on either end of your garden hose.
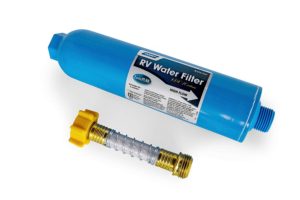
We also always use a water filter when filling our freshwater tank or running water through our city water Inlet. Put the filter on the end near the faucet. This will keep the weight off of your camper input.
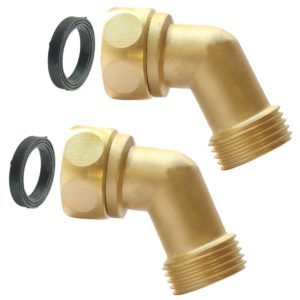
I also use this 45 degree angle water connection just to keep the extra pressure off my city water inlet.
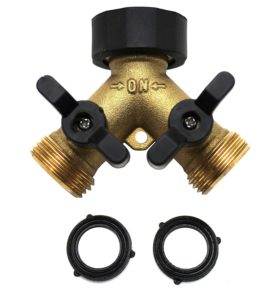
Also, super useful for water connections is a hose splitter. You can use it to hook up another hose to the campground water hookup to wash stuff off outside. Or, if someone is already on your water connection you can just add this and everyone has water.
On Board Water Filter
If your camper has an on board filter leave your filter out for de-winterizing. Remove the filter housing, dump the antifreeze that may be pooled in it, and reinstall the empty housing. Now turn on the water pump and run water through the housing. After all the antifreeze is removed from your system you may then remove the housing and reinstall your filter.
Great job! Now you have de-winterized your camper and you are ready to enjoy it!!
Happy Camping!


17 Comments
Tricia Snow
Really good tips! Living in FL we never had to do this but I am thinking this should be done regardless!
Holly Bird
Its that time of the year! Firs camping trip will be over Easter! Thank you for all the grat tips!
Janine
There is so much more to owning an RV than I ever realized. Your posts are always so eye opening.
Anna
Great informatio. It is so important to know how to do it correctly! Thank you for sharing
Meagan
After reading your blog I have learned so much about the world of RVing! There’s so much to owning an RV.
Brittany
I feel like I just read your post on winterizing! 🙂 Time flies! Great, informative post!
Caitlin
Thank you for sharing! My mom is interested in getting into RVing in the near future, I’m definitely sharing this with her!
Michele Vadnais
Oh my goodness! There is so much more than I ever realized to owning an RV!
Junell DuBois
Wow! I never knew so much went into RV ownership! Great resource!
Cindy
Wow so much to maintaining a camper/RV! I had no idea. You are so thorough in your descriptions and instructions.
Leigh Ann
There sure is a lot that goes into doing this the right way!
jen
Spring is here!!!! Time to travel!!! I’m hoping to jump into RV life in a couple of years. Love the posts!!
Tiffany
Great post – and more signs that spring is on the way! Can’t wait to start traveling and camping again!
Dennis Alongi
Thanks for the info!! RV living sounds like a lot of work but so fun!
Angela Greven | Mean Green Chef
Great tips, isn’t it exciting that de-winterizing is a topic now! 🙂 Thanks so much for sharing!
T.M. Brown
I can imagine how important this would be for those who live up in the cooler climates, or even just those getting ready to take the RVs out for the first time this year. I can’t believe that spring is just around the corner!
Dennis
These are fantastic tips! Well done!