Guide to Winterizing an RV
When it comes time to winterizing your water system in your RV please remember to do it before it gets below 32 degrees. If you are not comfortable winterizing your own camper, please bring it to your service technicians. There will be a fee for the RV technician to winterize your camper, but you are going to have an experienced person doing it and usually a warranty. This means that if the tech fails to winterize one faucet on your camper (your outside shower for instance), that dealer will normally warranty it, as long as you didn’t use your water system after they winterized it.
First, please use RV Antifreeze. This is the pink jug not the blue or green stuff we typically use for our cars. RV antifreeze is meant to go in water lines. This means it is safe for lines that you will be drinking out of in the future. It smells kind of sweet. I don’t recommend drinking it but I did have a customer make three pots of coffee with it. When I asked him if he felt alright, and if he could count my fingers, he told me he felt normal but it didn’t taste good.
You are going to hear a lot of people tell you that they just blow their water lines out with an air compressor. I do NOT recommend this. There are high and low points in water lines. Also the fittings, Ts, and elbows are plastic. The toilet bowl is also plastic along with faucets. If there is any amount of water left in any of these areas it can cause a split. If something does split it could be very expensive to fix. The elbow or T in the water line is usually in a terrible location to get to and repair (read = expensive to fix). This could get even more expensive if there is water damage.
Three gallons of RV Antifreeze will be enough to winterize most campers. If your camper has extra sinks, showers, outside kitchens, washing machines and or an ice maker, you may need an extra gallon. It’s always nicer to have an extra gallon than have to run out and buy another.
Water Heater
The first thing I recommend you do is make sure your water heater is off (both Gas and Electric). Then, remove your water heater plug. While you are outside, open up and start draining your freshwater tank. This will be a valve or a plug located under the camper. Open it and allow your freshwater tank to empty. Then, put the water heater in bypass mode. Most bypass valves for water heaters are located inside the camper on the back side of the water heater. Most likely a cupboard will have to be opened or a panel removed to see the water heater bypass valves.
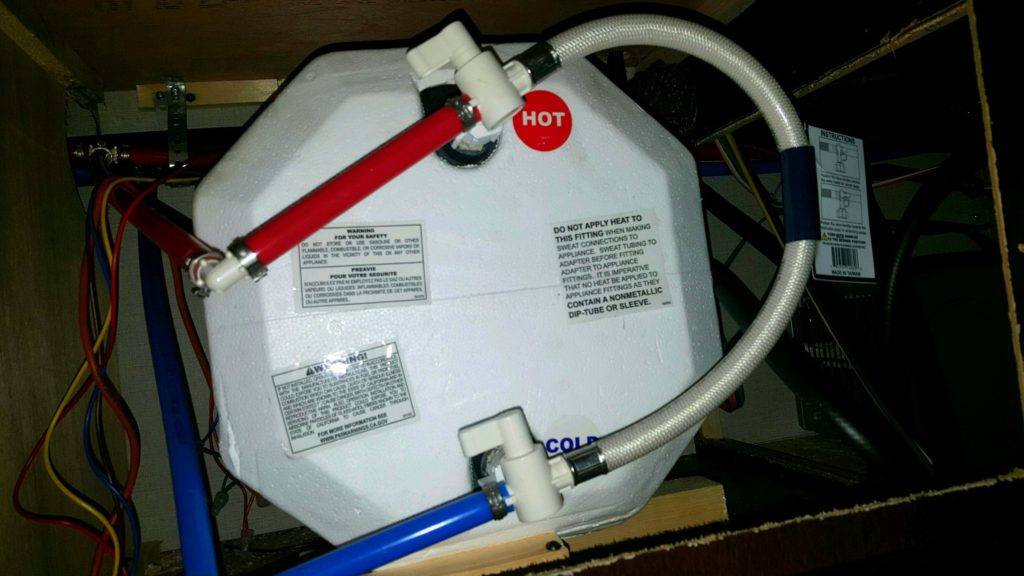
Most often there are three valves. On occasion there are two valves or even one valve. Examine your water heater to see how many valves are in your camper.
Bypass valves located in the basement
If there are three valves you must turn all three valves. The top valve should be switched from open to shut. The middle valve should be switched from closed to open, and the bottom valve should be switched from opened to closed.

If your water heater has two valves you will turn the handle so that the handles go perpendicular with the bypass tube meaning the valves will face each other.
If your water heater has one valve, turn it from perpendicular to the line to straight up and down.
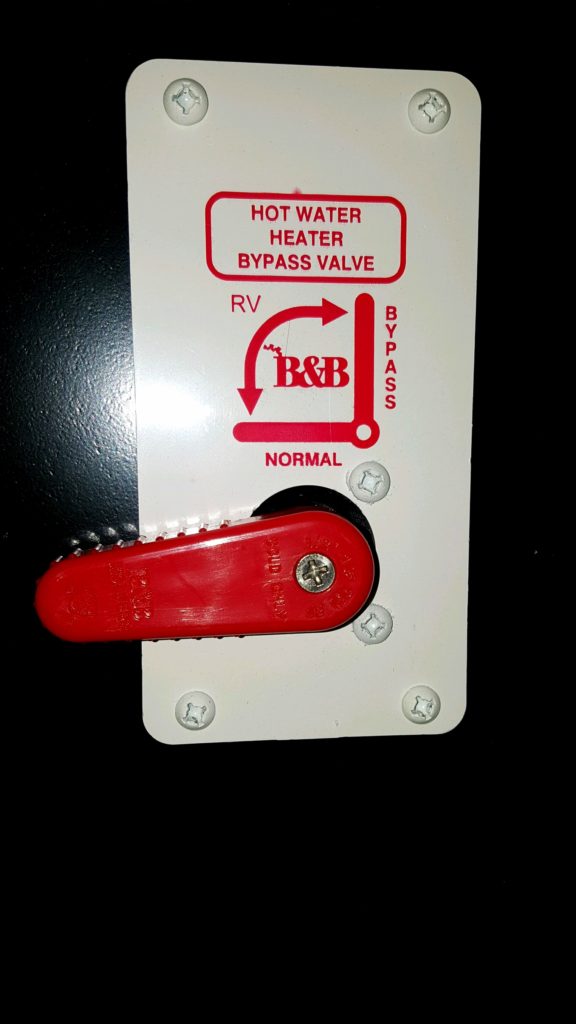
Single bypass valve located in the basement.
Now that the water heater is set to bypass, the anti-freeze will bypass your water heater while you are winterizing your water lines. Allowing antifreeze to go in your water heater is a waste of 6 gallons of antifreeze and could damage your heating elements. It also takes a long time to flush the antifreeze out of your water heater.
Note: If antifreeze comes out your water heater drain plug after you’ve turned your pump on and begin pumping antifreeze you have not properly bypassed your water heater. Adjust your valves.
Water Lines
Now it is time to focus on winterizing the water lines. First, be sure your faucets are all off and you have removed the sink stoppers in your sinks so you cannot overflow the sinks and flood to your camper.
Next, locate and access your water pump. If you are unsure where the water pump is located, turn on the water pump. The switch is normally a red toggle switch, that lights up when the pump is turned on, located on the monitor system.
Note: Use caution do NOT turn your water heater on if you don’t have water in it.
Now, walk around and listen for the water pump. Normally you can hear it vibrating. It is almost always located in a cupboard behind a panel or drawer. Once you have located the pump you can shut it off.
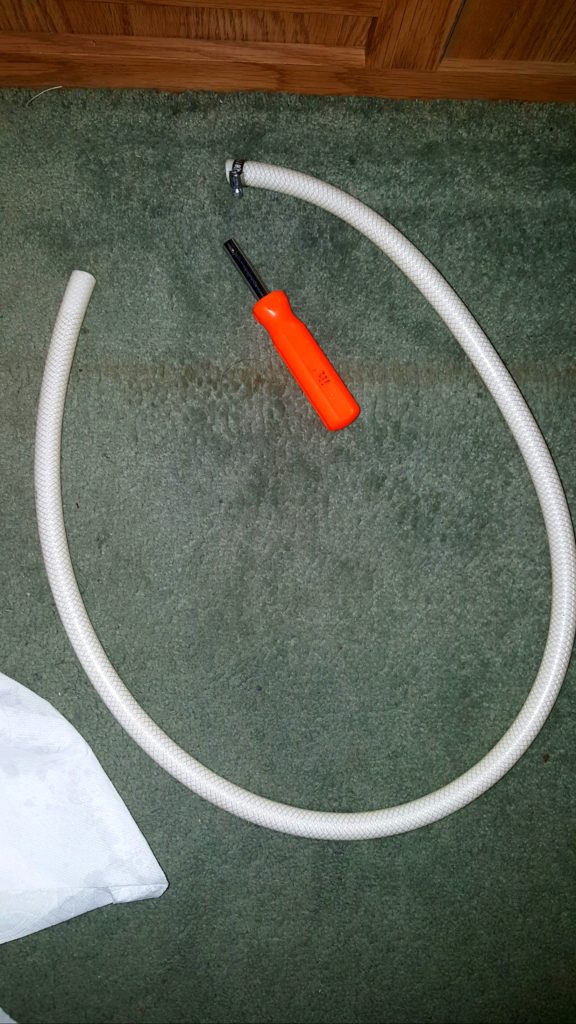
Next, examine your water lines going to and from your water pump. Many new campers already have winterizing hoses attached and all you need to do is turn some valves. If your camper does not have a winterizing hose, you will need to buy one.

Now to the actual step by step process.
1. Remove the water line coming from your freshwater tank to the water pump.

Water pump with hose to freshwater tank removed.
2. Screw one end of your winterizing hose on your water pump. The other end goes inside the first gallon of antifreeze. The reason to use the water pump to winterize the water lines is because there is water in the water pump and a water pump can split when it gets below 32 degrees. Using this method protects your water pump too.
Note: It is nice to have two people doing this next part. One person opening valves the other person monitoring the antifreeze jug to ensure it doesn’t run out of antifreeze or tip over.
3. Turn on your water pump. The antifreeze will start sucking out of the jug.
4. At your farthest faucet, open the cold side first. Run the water until you see pink antifreeze. Shut the cold side. Open the hot side. Run the water until you see pink antifreeze. Repeat this process for all your sinks, bathtub and shower wand. Don’t forget any outside kitchens or showers.
5. Step on your toilet valve gently. Run the water until you see pink antifreeze.
6. If your camper has a washing machine hookup you have to winterize this line too, even if you don’t have a washing machine in your camper. To do this I usually just run the water into a garbage can until I see the pink antifreeze. Then I wash the wall and dump the garbage can OUTSIDE.
7. Once you have winterized every faucet you can now pour your extra antifreeze down each one of your drains (sinks, bathtub, and shower) to be sure your P-traps have antifreeze in them. I recommend at least 2 cups of antifreeze down each drain.
8. Wipe out the sinks, bathtub and shower with a dry clean paper towel to clean up the pink antifreeze to ensure that it doesn’t stain. It usually doesn’t but we do it anyway, just to be sure.
9. If your camper has low point drains (two hoses side by side hanging below the underside of the camper), crack them open, just for a second, to ensure there is antifreeze in those hoses.
10. Shut off the water pump and remove your winterizing hose, or turn your valves back to summer use. This will save you time in the spring while de-winterizing your camper.
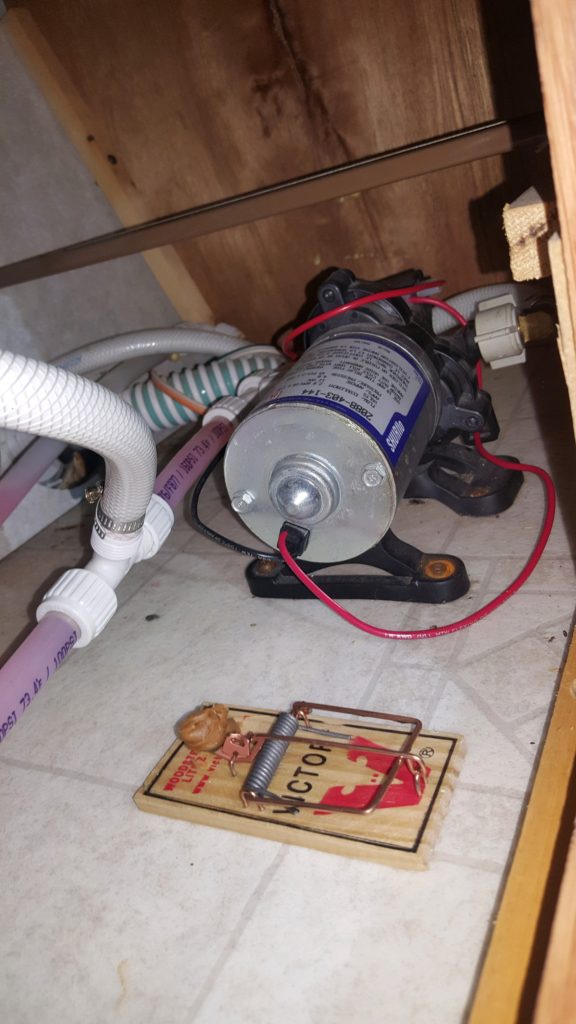
Winterized RV Water Pump. Note the pink in the water lines.
11. If your camper is equipped with a black tank flush, it is wise to pump antifreeze from the outside of your camper into your tank (your RV dealer will have manual or electric pumps for this). You could also use an RV blowout plug and blow a little air into the line. These lines are not usually a problem but I recommend covering all your bases.

Blowout plug for winterizing black tank flush
The last step in winterizing your water system is to empty your black and grey holding tanks. To be sure this is done completely please see this article.
A couple of special notes:
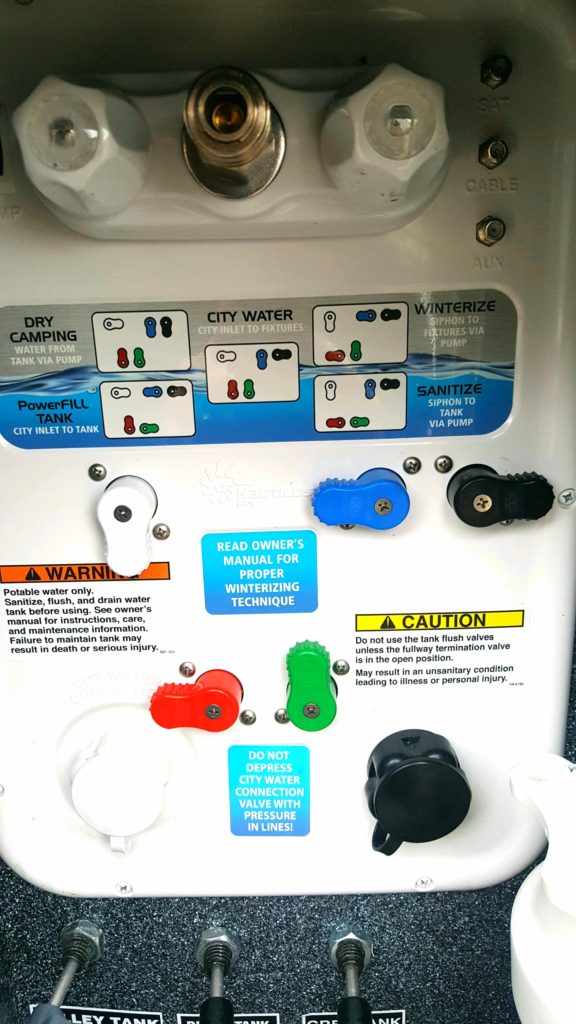
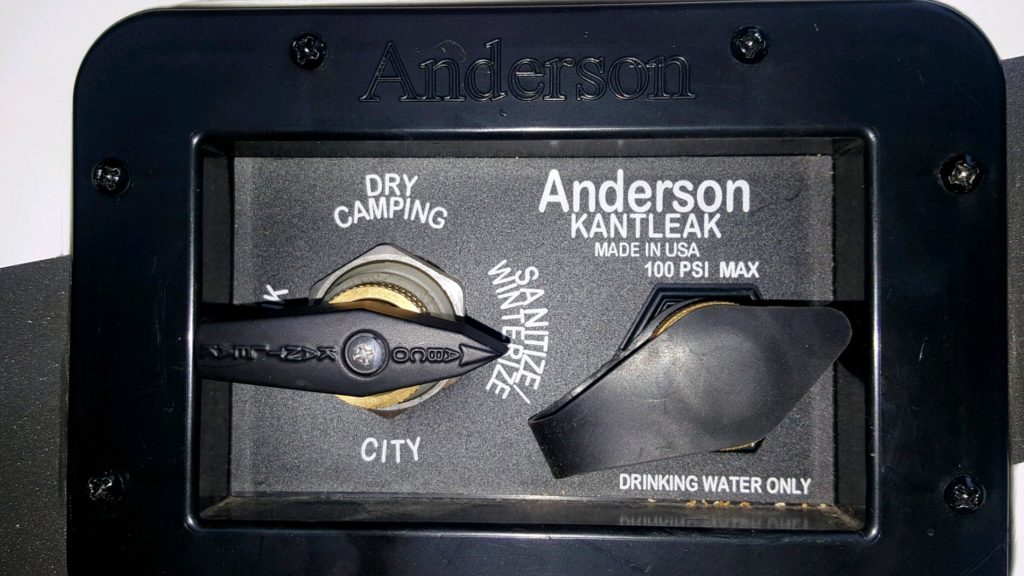
There are some fifth wheels and travel trailers that have the water heater bypass switches in the basement or water access point. See below for an example.
If the camper has an on-board water filter, remove the water filter before you begin winterizing. Water filters are so good, they take the pink out of the antifreeze making it difficult to tell when you are winterized. Leave your filter sit in a bucket over the winter.
If the camper has an ice maker in a 110 house style refrigerator, you may need to leave the water pump pressurized and antifreeze available to draw from for 24 hours. The ice maker must cycle. If the ice cubes are not pink, you could have frozen refrigerator lines.
If the camper is a park model, or destination trailer, it may not have a water pump. If this is the case, you will need to buy some kind of pump to draw the antifreeze from and pump it through your water lines.
Happy Camping!


28 Comments
Liz Siemers
This guide is so thorough and well written! I don’t own an RV but I would feel intimidated by tasks like this, thank you for making it simple!
Tricia Snow
Living in Florida I had no idea this was a “thing”. We plan to get another RV and travel the country so I am glad someone told me about it!
Pam
Love the step by step instructions. I don’t have a RV to winterize, but if I did, I’d use this guide for sure!!
Andrew Shakespeare
Thanks you for this information. I’d never have thought of all this on my own, never mind figure out how to put it all together.
Jocelyn
This is super helpful and informative! I’ll have to save this for future reference, once we have an RV someday!
Rosanna
Thanks for the info. I will pass this onto my sister.
Nina
Super thorough list! Thank you for putting this together!
Dennis
You lay out the steps so beautifully. Great pictures and easy to follow.
Melissa Parcel
This will come in very handy for those searching for this information.
Jennifer Morrison
These are great tips! It is so important to take care of this type of property so that it does not corrode over the winter.
Cassie
We need to do this to our trailer ASAP. I’m going to share these tips with my husband before he does it!
Nicki
Great! Thank you!
Mary
Wow, I love how clear this guide is! The photos are so helpful. Thank you!
Brooke
This is so helpful! Your detailed pictures and explanations make it much simpler.
Heidi Hourani
Hi Nikki,
This is such a great post! I don’t have an RV, but I think it’s great that you offer these great tips for people who do own an RV and want to learn how to winterize their RV on their own.
– Heidi Hourani
Tonya @ the Writer Mom
We probably won’t own an RV for a long time, but someday maybe, and we’ll definitely need to remember to winterize it where we live!
Monica
My husband and I have often talked about getting an RV to travel since the kids are little and won’t be able to be away from school for weeks at a time. We like to do road trips and this would be much more fun and comfortable in my opinion.
Michele
So perfect that you added the step-by-step photos! I almost think I could do this!
Nicki
Thank you!
T.M. Brown
This is GREAT information!! We have been considering at least renting an RV for an upcoming trip and just knowing that I have this site as a reference in case anything goes wrong. Thanks!
Arianny Rodriguez
I don’t know much about maintaining an RV but they look really fun. Thanks for the info!
Christa
I live in the desert, so don’t think about winterizing things too often. This post is so thorough and easy to follow. Such an incredible resource!
Dee
Great instructions for people with a RV
Kathryn at QuestFor47
I’m not an RV-er, but I can imagine that this is SO important. It’s just like the most important things you need to know for owning a home where there’s winter weather, except your home…moves! So informative!
Annette
Great information you have shared!! We just winterized our toy hauler for the winter. It is soo sad to put it away, but we’ll be ready to get it out in May for more fun times!!!
Nicki
Thank you so much! It is sad to put them away for the winter though.
Vessy
Whooooa! This is an incredibly informative post. I have never even been in an RV and I am fascinated with all the stuff one has to consider to maintain it well! Great info!
Julie
This is good info – thank you!